AWS Private CA
To allow Golioth to use your AWS Private Certificate Authority service as a PKI provider for your project, you need to go through a few steps in the AWS Console before you can configure a connection from Golioth.
For information about how you can establish a CA in AWS Private CA and issue end-entity certificates, please refer to the official AWS documentation.
Configuring AWS
Golioth supports two authentication methods for connecting to AWS Private CA: Web Identity and Access Keys. We strongly recommend using Web Identity, as this will allow Golioth to authenticate against your Private CA without storing long term credentials.
Select your preferred authentication method below to read more about how to set up your AWS instance to allow Golioth to authenticate against it.
- Web Identity
- Access key
To allow Golioth to securely connect directly to your AWS Private CA service with an identity provider, you'll need to create an IAM policy with the required permissions, then assign that to a role. The role will be verified by the Golioth OpenID Connect (OIDC) Identity Provider.
1. Create a policy
Golioth requires a few permissions in the AWS Private CA service to be able to authenticate devices and rotate certificates.
As none of the default policies fit the permissions requirements exactly, we'll start by creating a new policy specifically for the integration with Golioth.
As an admin or an IAM user with the required permissions, navigate to the IAM Policy section, and click Create Policy. Using the JSON Policy editor, add the following policy:
{
  "Version": "2012-10-17",
  "Statement": [
    {
      "Effect": "Allow",
      "Action": [
        "acm-pca:ListCertificateAuthorities",
        "acm-pca:GetCertificateAuthorityCertificate",
        "acm-pca:GetCertificate"
      ],
      "Resource": "*"
    },
    {
      "Effect": "Allow",
      "Action": ["acm-pca:IssueCertificate"],
      "Resource": "arn:aws:acm-pca:*:*:certificate-authority/*",
      "Condition": {
        "ArnLike": {
          "acm-pca:TemplateArn": [
            "arn:aws:acm-pca:*:*:template/EndEntityClientAuthCertificate_APIPassthrough/V*"
          ]
        }
      }
    }
  ]
}
2. Register ID Provider
Once we have created a policy, we'll need to register the Golioth identity provider as a trusted Identity Provider. In the IAM Identity Providers section, click Add Provider.
Under Provider type, select OpenID Connect, then set the Provider URL to https://api.golioth.io/oidc, and the Audience to sts.amazonaws.com.
Click Add Provider to save the new provider.
3. Create a role
Next, we need to create a role that Golioth can assume when it connects to AWS. In the IAM Roles section, click Create Role.
Under Trusted entity type, select Web identity, and select the Identity provider and audience you created in the previous step.
Add a condition by clicking Add Condition. Under Key, select api.golioth.dev/oidc:sub. Set Condition to StringEquals, and Value to match the following format:
project:<golioth-org>/<golioth-project>
Here, <golioth-org>/<golioth-project> is the organization and project slugs for your project, as seen in the Golioth Console. For instance, if the Golioth Console URI for your project is https://console.golioth.io/org/myorg/project/myproject, Golioth will use project:myorg/myproject as its token subject when connecting to AWS.
The condition is the mechanism that allows AWS to control which Golioth projects are allowed to connect to the Private CA. It is crucial that the condition is included in the role definition, as failing to add this will allow any Golioth project in any organization to connect to the Private CA.
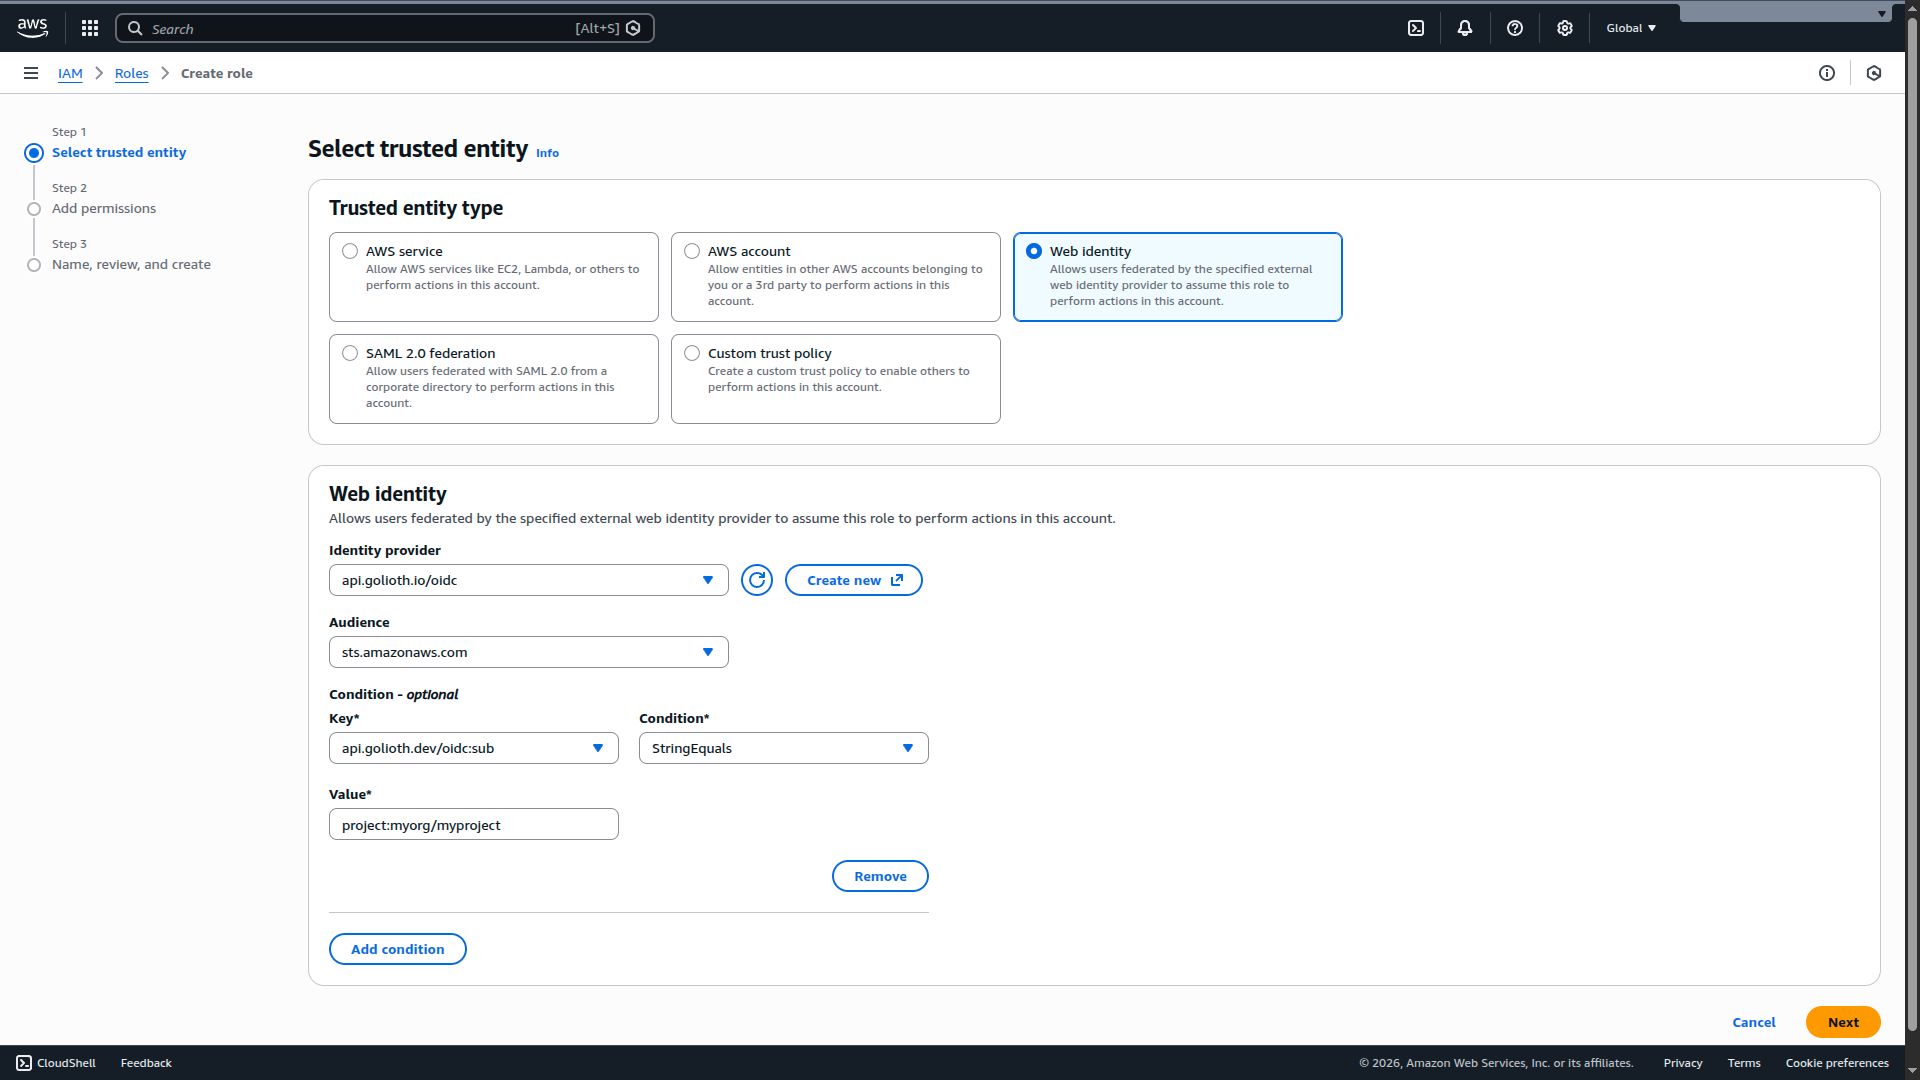
Click Next to move to the "Add Permissions" screen.
4. Attach the policy to the role
In the "Add Permissions" screen, search for the policy created in step 1. Select the policy, and click Next to go the final role creation page.
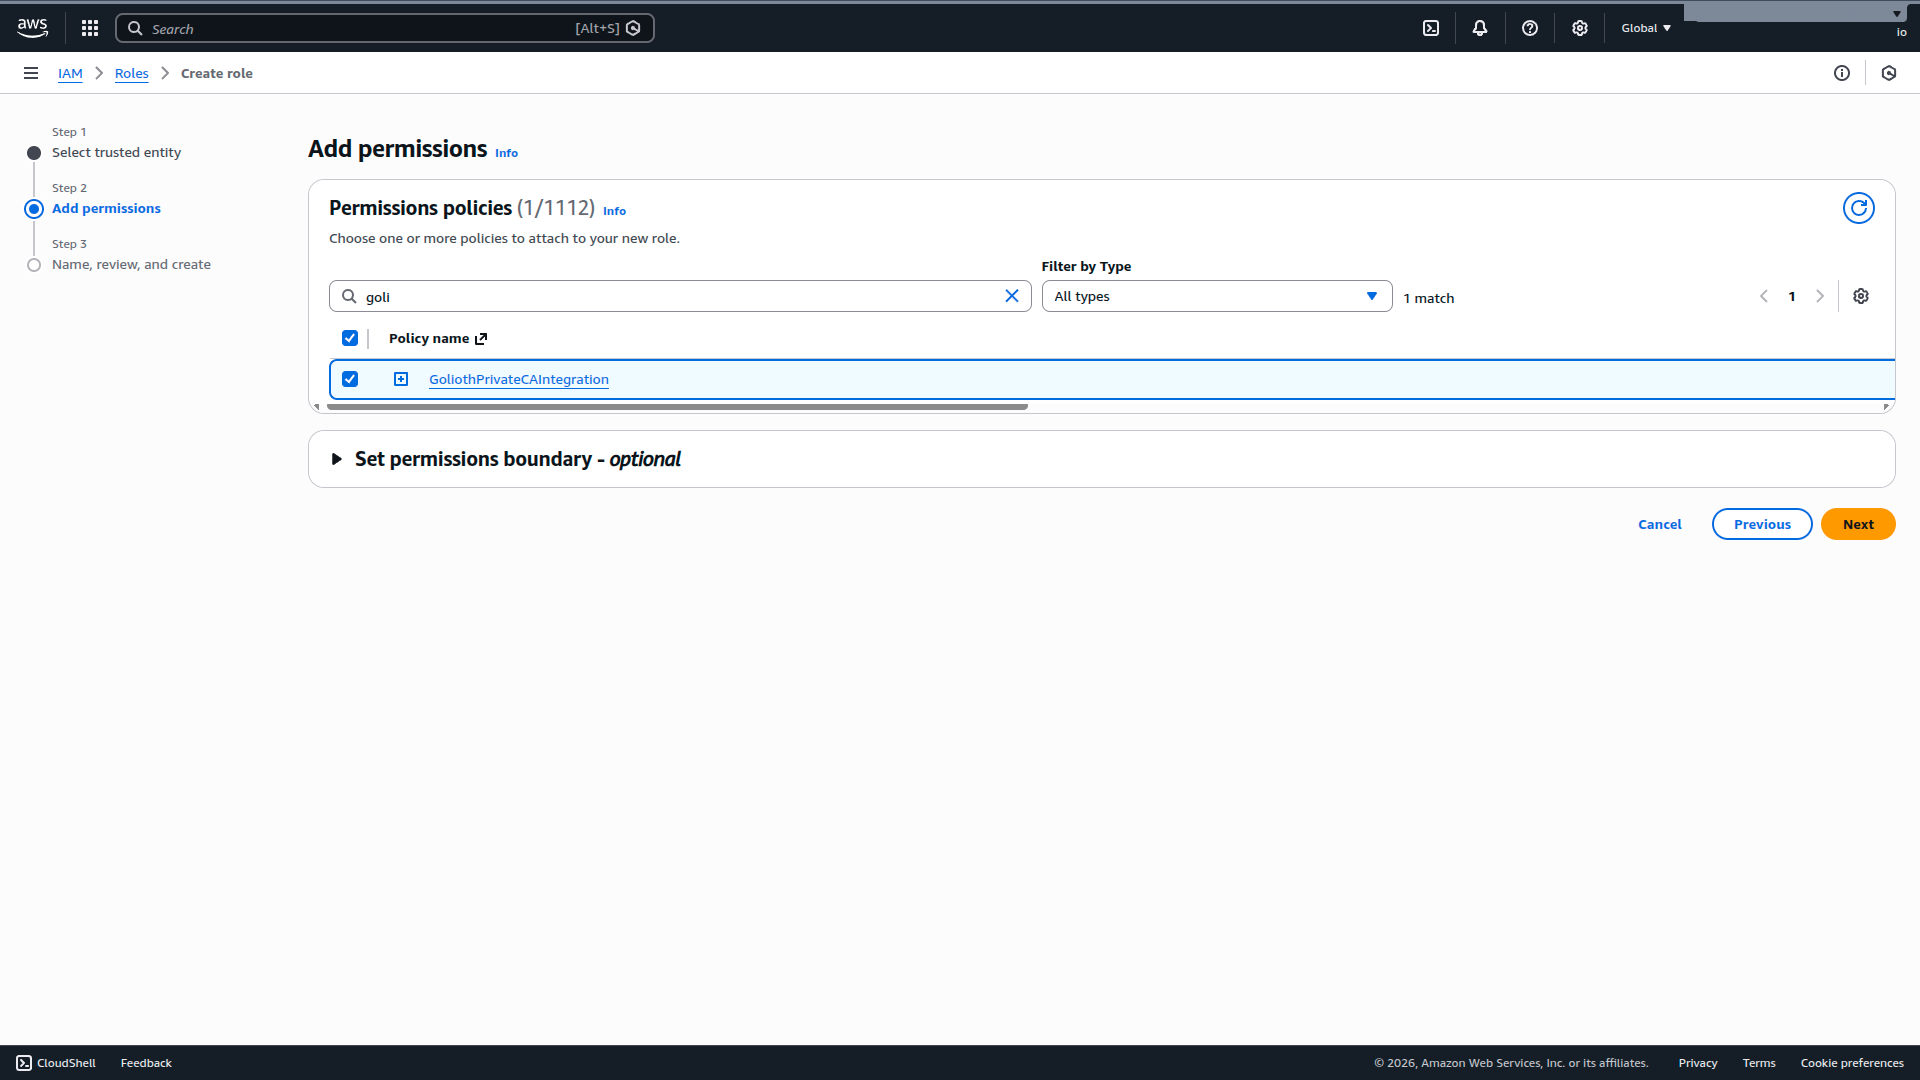
Finally, give the new role a name and an optional description and click Create Role.
Connecting to AWS from the Golioth Console
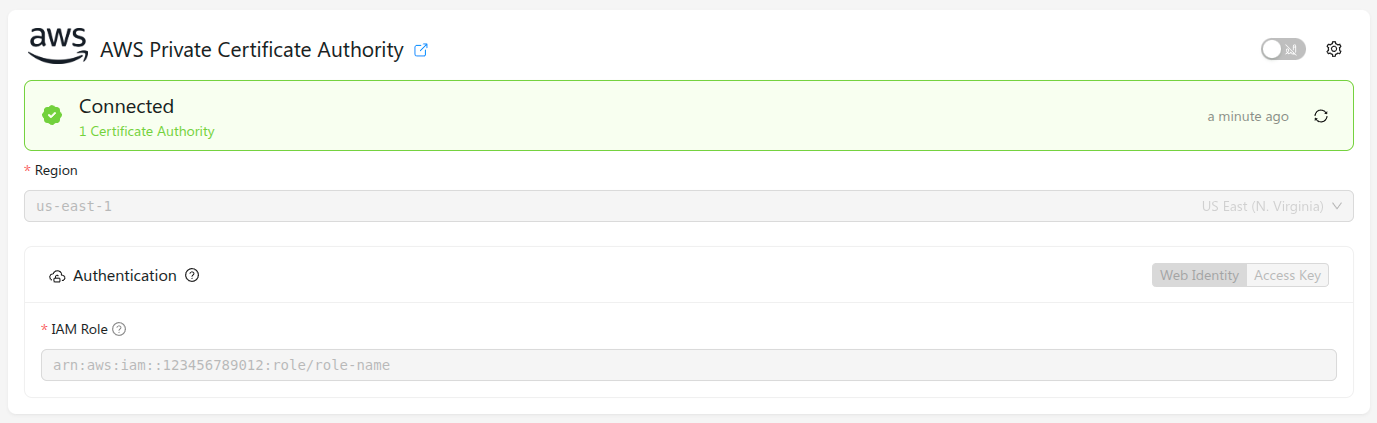
Once you have an AWS IAM role with the required permissions, you can configure Golioth's connection to the AWS Private CA from the Golioth Console. Navigate to the PKI Providers section in the sidebar, and click Add Provider. In the modal window, select AWS Private Certificate Authority, and the correct region for your AWS instance. Under Authentication, select Web Identity, and add the ARN of the role you created in the AWS Console, then click Connect. The provider will be added to the list of known providers, and a provider status check will run.
AWS usually takes a couple of minutes to deploy your policy, and the status check
may report AccessDenied: Not authorized to perform sts:AssumeRoleWithWebIdentity status code: 403 or a similar error while your changes are being processed.
Once everything is configured correctly and your policy is deployed, the provider status should change to "Connected", and list the number of available certificate authorities.
To allow Golioth to securely connect directly to your AWS Private CA service with an access key, you'll need to create an IAM policy with the required permissions, then assign that to a user.
1. Create a policy
Golioth requires a few permissions in the AWS Private CA service to be able to authenticate devices and rotate certificates.
As none of the default policies fit the permissions requirements exactly, we'll start by creating a new policy specifically for the integration with Golioth.
As an admin or an IAM user with the required permissions, navigate to the IAM Policy section, and click Create Policy. Using the JSON Policy editor, add the following policy:
{
  "Version": "2012-10-17",
  "Statement": [
    {
      "Effect": "Allow",
      "Action": [
        "acm-pca:ListCertificateAuthorities",
        "acm-pca:GetCertificateAuthorityCertificate",
        "acm-pca:GetCertificate"
      ],
      "Resource": "*"
    },
    {
      "Effect": "Allow",
      "Action": ["acm-pca:IssueCertificate"],
      "Resource": "arn:aws:acm-pca:*:*:certificate-authority/*",
      "Condition": {
        "ArnLike": {
          "acm-pca:TemplateArn": [
            "arn:aws:acm-pca:*:*:template/EndEntityClientAuthCertificate_APIPassthrough/V*"
          ]
        }
      }
    }
  ]
}
The first statement in this policy enables Golioth to iterate through your
certificate authorities, and retrieve their certificates. The second statement
allows Golioth to issue device certificates using the
EndEntityClientAuthCertificate_APIPassthrough/V1
template.
If you do not need certificate rotation capabilities, the AWSPrivateCAReadOnly standard policy can be used instead.
Save this policy with a recognizable name and description.
2. Create an IAM user
Golioth connects to your AWS Private CA service as an IAM user. Although it's possible for Golioth to authenticate as an existing user, we strongly recommend establishing a dedicated user to maintain a narrow set of permissions.
As an admin or an IAM user with the required permissions, navigate to the IAM User Management Dashboard in the AWS Console, and click Create User.

Pick a recognizable user name, and click Next to go to the permissions screen.
3. Attach the policy to the user
In the "Set Permissions" screen, select Attach policies directly, and search for the policy created in step 1. Select the policy, and click Next to go the final user creation page.
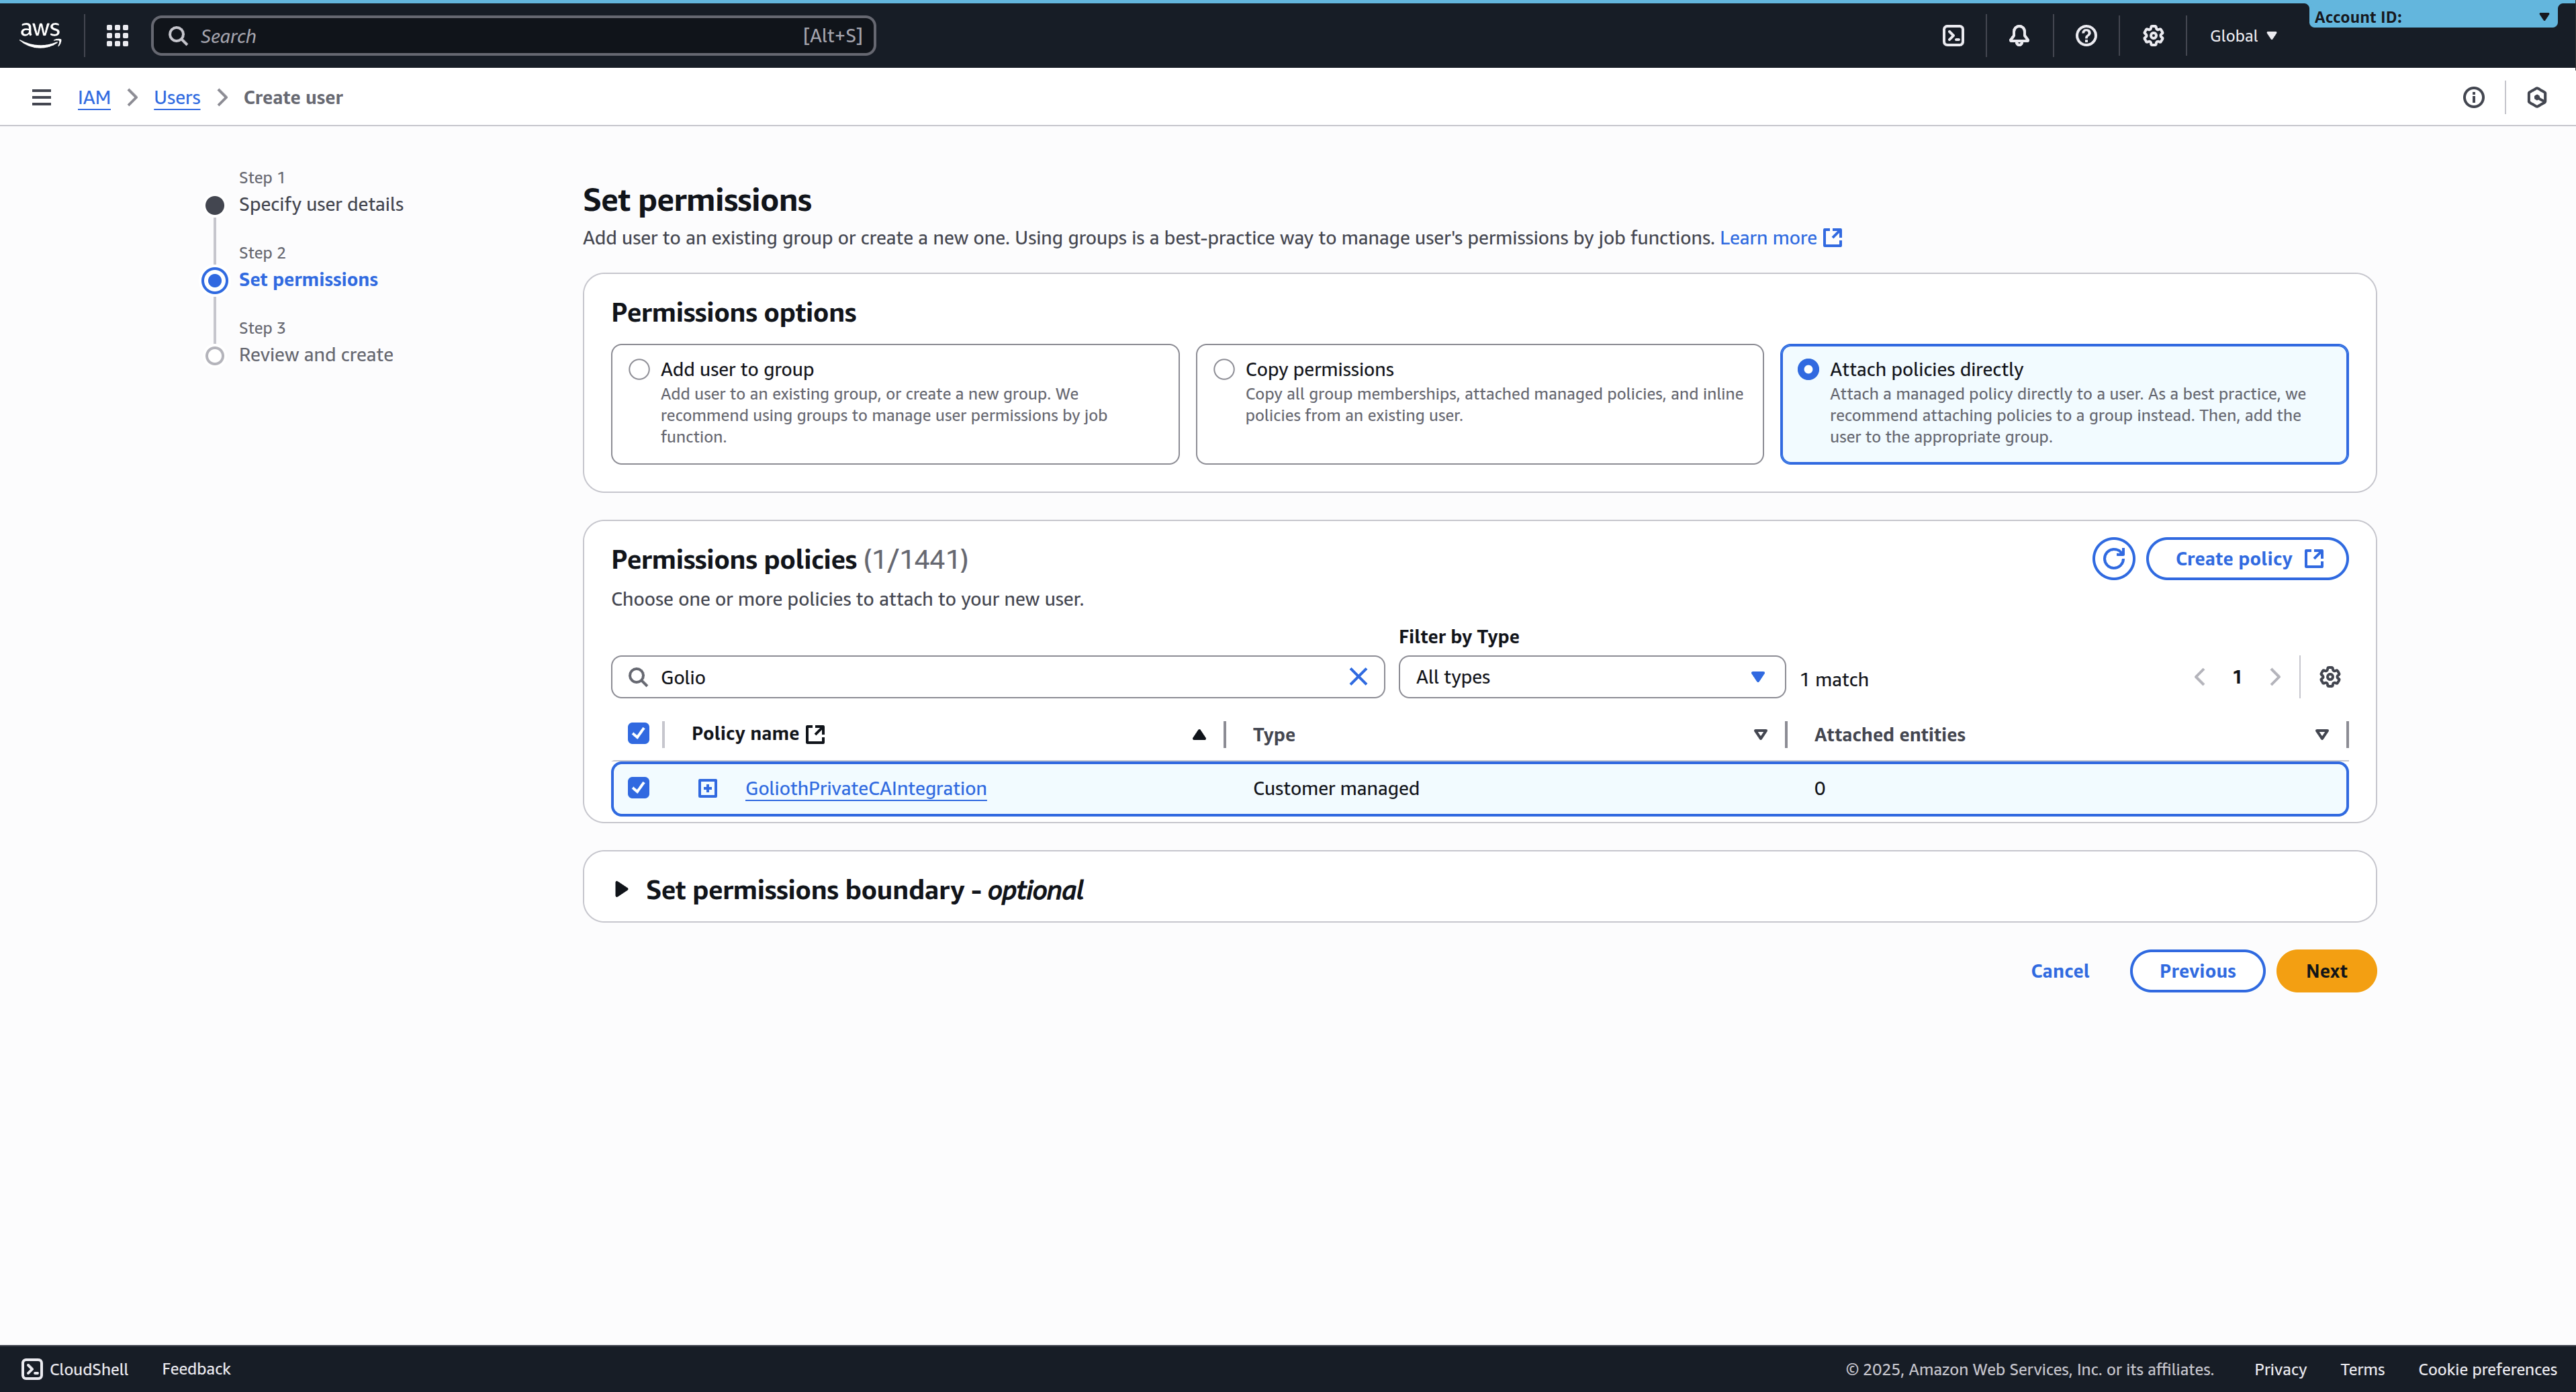
Policies can either be attached to the user directly when you create it, or by assigning the user to a user group with the required permissions.
4. Create an access key
Once the user is created with the required permissions, you'll need to create an access key that Golioth can use to authenticate as that user.
Follow the AWS documentation for instructions on how to create an access key for an IAM user. Note that the secret access key is only available during the creation process, and must be saved before leaving the page.
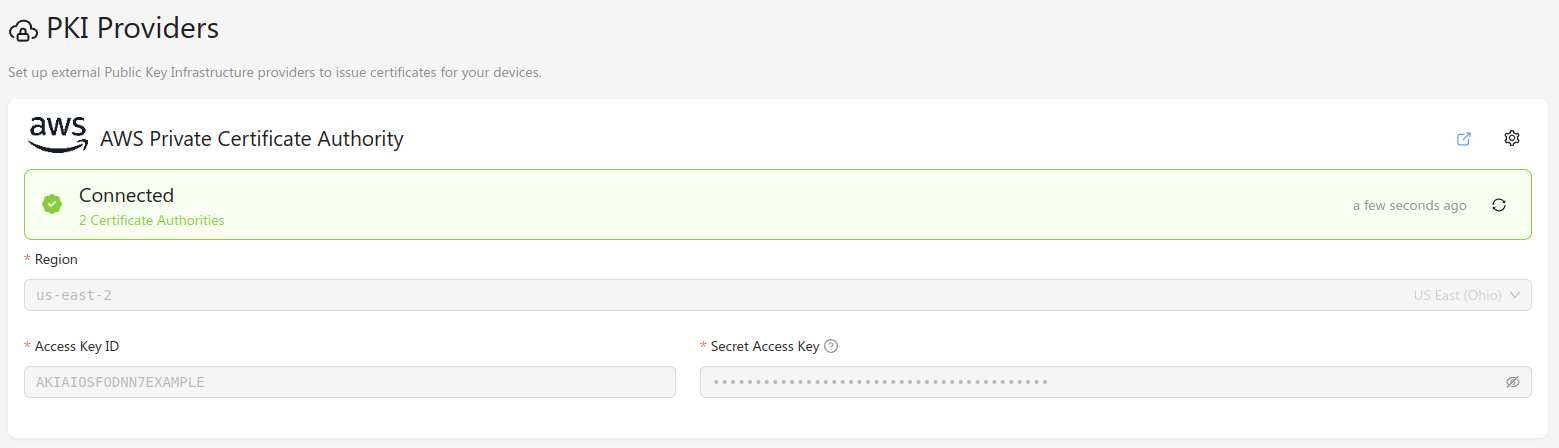
Connecting to AWS from the Golioth Console
Once you have an AWS IAM user with the required permissions, you can configure Golioth's connection to the AWS Private CA from the Golioth Console. Navigate to the PKI Providers section in the sidebar, and click Add Provider. In the modal window, select AWS Private Certificate Authority, and the correct region for your AWS instance. Add the Access Key ID and Secret Access Key that you created in the AWS Console, and click Connect. The provider will be added to the list of known providers, and a provider status check will run.
If everything is configured correctly, the provider status should change to "Connected", and list the number of available certificate authorities.
Issuing Device Certificates
Device certificates are End Entity Certificates in AWS.
As outlined in the Certificate ID section, the device certificate subject needs to include the following attributes:
Organization: the device's project IDCommonName: a unique device certificate ID
Other subject attributes are ignored.
When performing certificate rotation, Golioth will submit certificate signing
requests to the AWS Private CA with the
EndEntityClientAuthCertificate_APIPassthrough/V1
template.
The request will be submitted with an API passthrough value containing the
subject attributes above.